

Ever heard of AutoGen? It’s one of the latest buzzwords in the tech world, and for a good reason. Imagine having the power to build intelligent AI agents with ease. Sounds intriguing, right?
But what exactly is AutoGen, and why is everyone talking about it? Stick around, and you’ll discover how this tool is revolutionizing the way we interact with artificial intelligence. Curious about how it could change your projects or workflow? Let’s dive in!
1 What is AutoGen?
AutoGen is a framework for simplifying the creation and maintenance of applications that use large language models (LLMs) to generate text or code. AutoGen allows developers to design conversable agents that can leverage the capabilities of LLMs like GPT-4, as well as integrate with other tools and humans. AutoGen can automate complex workflows that involve multiple agents communicating with each other to solve tasks.
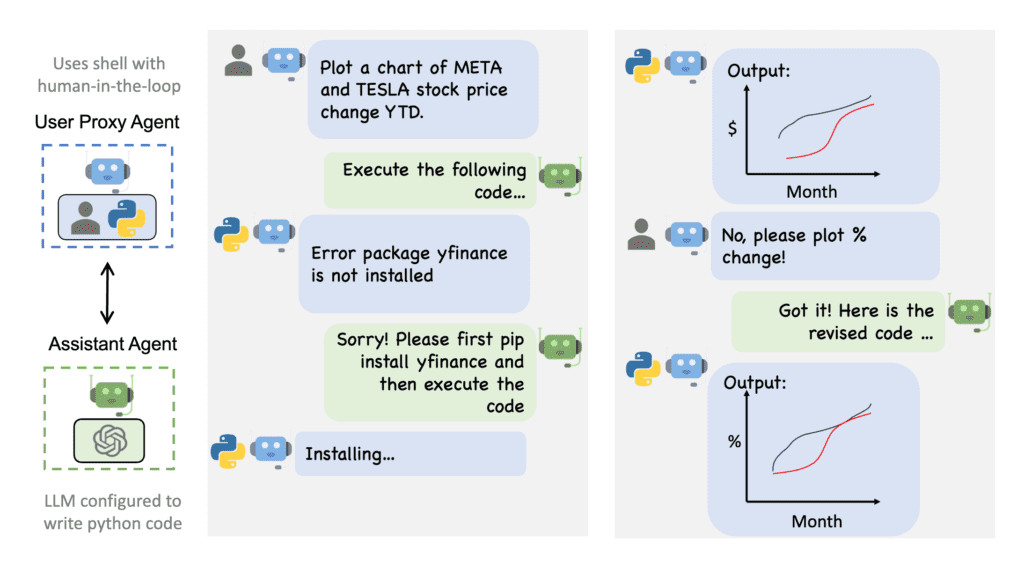
For example, AutoGen can help create a system for code-based question answering, where one agent writes the code, another agent checks the safety, and a third agent executes the code and interprets the results. AutoGen is developed by Microsoft Research and is one of the most exciting developments in AI recently.
2 Benefits of AutoGen
- Simplifies LLM Workflows: AutoGen offers a framework that simplifies the orchestration, optimization, and automation of large language model (LLM) workflows.
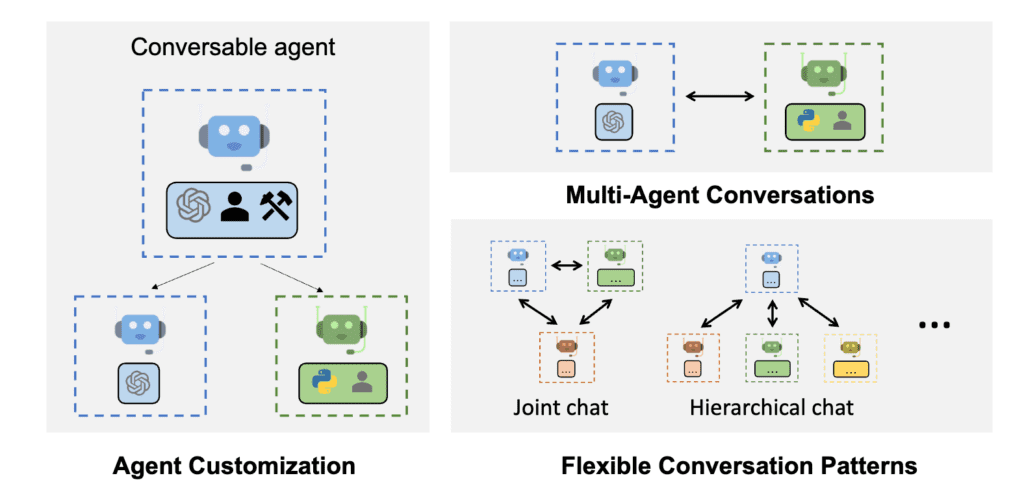
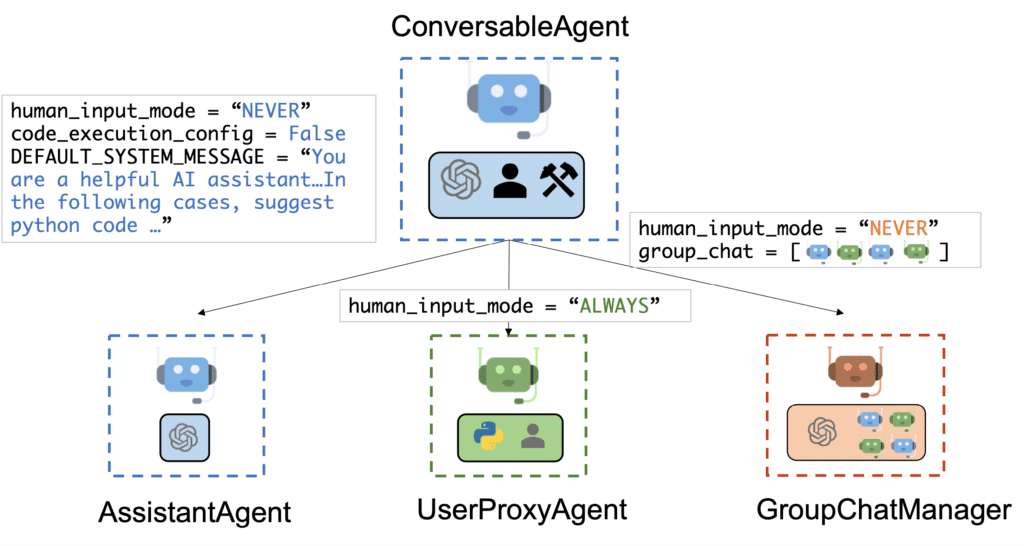
- Customizable and Conversable Agents: It provides agents that are both customizable and capable of having conversations, leveraging the capabilities of advanced LLMs like GPT-4.
- Integrates with Humans and Tools: AutoGen addresses the limitations of LLMs by allowing integration with humans and tools, facilitating conversations between multiple agents.
- Intuitive and Modular Design: Building complex multi-agent systems is made intuitive and modular, making agents reusable and composable.
- Significant Reduction in Coding Effort: Using AutoGen can lead to more than a 4x reduction in the effort required for coding.
- Versatile Agent Capabilities: Agents can be configured to use LLMs, humans, tools, or a combination of these elements, offering a wide range of capabilities.
- Seamless User Engagement: Allows users to seamlessly opt in or opt out via an agent in the chat, offering flexibility in engagement.
- Supports Dynamic Group Chats: AutoGen enables dynamic group chats between multiple agents, expanding the possibilities for collaborative tasks.
- Open-Source and Community-Driven: AutoGen is an open-source project that encourages contributions from a diverse community, ensuring continuous improvement and innovation.
3 Preparing for AutoGen Installation
Before diving into the installation process, it’s essential to ensure that your system is ready and that you have all the necessary components in place. Here’s what you need to do:
- Python Setup: Ensure you have Python version >= 3.8 installed on your system. If not, download and install it from the official Python website.
- IDE Setup: While the video uses PyCharm as the Integrated Development Environment (IDE), we’ll be using Visual Studio Code (VS Code) for this guide. If you haven’t already, download and install VS Code.
- OpenAI API Key: You’ll need an API key from OpenAI to use AutoGen. If you haven’t already:
- Sign up or log in to your OpenAI account.
- Navigate to the API section and generate a new API key.
- Keep this key handy; you’ll need it during the installation process.
- Billing with OpenAI: Ensure your billing details are correctly set up with OpenAI. Sometimes, issues might arise if the billing isn’t configured correctly. If you encounter any errors related to GPT-4 or other OpenAI-related issues, double-check your billing setup.
4 Installation Process
With the preparations out of the way, let’s move on to the actual installation process:
Install AutoGen: Open the terminal in VS Code and type the following command to install AutoGen:
pip install pyautogen
Install OpenAI Library: To communicate with OpenAI’s services, you’ll need the OpenAI library. Install it using:
pip install openai
Setting up the API Key in VS Code:
- Create a new Python file in VS Code.
- At the top of your file, import the OpenAI library and set up your API key as follows:
import openai
openai.api_key = "YOUR_OPENAI_API_KEY"
Replace YOUR_OPENAI_API_KEY with the API key you generated earlier.
Testing the Setup:
To ensure that AutoGen and OpenAI are working seamlessly together, you can use the Quickstart code provided by AutoGen. Here’s a step-by-step guide:
- Setting Up the Code:First, open a new Python file in VS Code. Copy and paste the following code into the file:
import openai
from autogen import AssistantAgent, UserProxyAgent, config_list_from_json

# Set up your OpenAI API key
openai.api_key = "YOUR_OPENAI_API_KEY"

# Load LLM inference endpoints (you might need to adjust this based on your setup)
config_list = config_list_from_json(env_or_file="OAI_CONFIG_LIST")

# Initialize the Assistant and UserProxy agents
assistant = AssistantAgent("assistant", llm_config={"config_list": config_list})
user_proxy = UserProxyAgent("user_proxy", code_execution_config={"work_dir": "coding"})

# Initiate a chat between the two agents with a specific task/message
user_proxy.initiate_chat(assistant, message="Plot a chart of NVDA and TESLA stock price change YTD.")
- Make sure to replace
YOUR_OPENAI_API_KEYwith your actual OpenAI API key. - Modifying the Task:The line user_proxy.initiate_chat(assistant, message=”Plot a chart of NVDA and TESLA stock price change YTD.”)
is where you specify the task or message you want the agents to perform. You can replace the content inside the quotes with any other task you’d like to test. - Running the Script:Once you’ve set up and possibly modified the code, save the file. Then, in VS Code, navigate to the terminal and run the script by typing:
python your_filename.py
- Replace
your_filename.pywith the name you saved your Python file as. - Interpreting the Output:After running the script, you should see the output in the terminal. This output represents the conversation between the two agents as they work to solve the task you specified. If you see a meaningful conversation and a solution to your task, it means everything is set up correctly.
5 How to Use AutoGen
Alright, now that we’ve got AutoGen up and running, let’s get our hands dirty and dive into the fun part – actually using it! If you’re as excited as I am about the potential of this tool, you’re in for a treat. Let’s break it down step by step, ensuring you get the most out of AutoGen.
1. Embrace the Power of Multi-Agent Conversations:
The beauty of AutoGen lies in its ability to facilitate conversations between multiple agents. Think of it as a team of experts, each with its own specialty, working together to solve a problem. Start by understanding the roles of each agent and how they can collaborate to achieve the desired outcome.
2. Customize, Customize, Customize:
Remember, one size doesn’t fit all. AutoGen gives you the freedom to tailor agents to your specific needs. Whether you want to integrate a specific LLM, allow certain types of human input, or employ particular tools, AutoGen’s got you covered.
3. Human Touch:
AI is fantastic, but sometimes, nothing beats the human touch. AutoGen seamlessly integrates human input, allowing for real-time feedback and adjustments. This means you can jump into a conversation, provide guidance, and then let the agents take it from there.
4. Dive into the Code:
Using the sample code we provided during the installation process, start by experimenting with different tasks. Modify the message in the user_proxy.initiate_chat() function to see how the agents respond to various challenges.
5. Advanced Features Await:
As you get more comfortable with the basics, explore the advanced functionalities AutoGen offers. From performance tuning to error handling, there’s a lot under the hood waiting to be discovered.
6 AutoGen Use Cases
AUTOGEN experiments: Space Shooter#python #gpt4 pic.twitter.com/w252GAL39z
— function star💫 (@functionstar_) October 6, 2023
I was able to scrape the Internet n generate HTML code
— peter! 🥷 (@pwang_szn) October 7, 2023
<59 lines using Autogen 😀 pic.twitter.com/QgCzSAfjtU
7 Advanced Multi-Agent Systems with AutoGen
the term “multi-agent systems” is more than just a buzzword; it’s a game-changer. With the rise of artificial intelligence and the increasing complexity of tasks we want to automate, the need for multiple agents that can work together seamlessly has never been more evident. Enter AutoGen, a groundbreaking tool developed by Microsoft, designed to harness the power of these systems.
Understanding Multi-Agent Systems
At its core, a multi-agent system is a coordinated network of agents, each with its own set of capabilities, working together to achieve a common goal. These agents can be anything from AI models to humans, and their collaborative efforts often lead to solutions that are more efficient and sophisticated than what a single agent could achieve.
AutoGen’s Role in Multi-Agent Systems
-
Complex Conversations Made Simple: AutoGen introduces a multi-agent conversation framework that’s both intuitive and powerful. Agents can integrate with Large Language Models (LLMs) like GPT-4, other tools, and even humans, leading to dynamic and productive conversations.
-
Customization at its Best: Every problem is unique, and so should be the solution. AutoGen allows for unparalleled customization, letting developers tailor agents to the specific needs of the task at hand. Whether it’s choosing which LLMs to employ, deciding on the types of human input to integrate, or selecting the tools to use, AutoGen offers flexibility like no other.
-
Real-world Application: Imagine a system where one agent writes code, another checks its safety, and a third executes it, interpreting the results. With AutoGen, this isn’t science fiction; it’s a reality. Such collaborative efforts ensure efficient and accurate solutions, pushing the boundaries of what we thought was possible.
8 Conclusion
AutoGen is a game-changer in the tech world. It makes creating AI tools easier and more efficient. With AutoGen, you don’t need to be an expert to build powerful AI systems.
It’s user-friendly, adaptable, and opens up many possibilities for both developers and everyday users. In short, AutoGen is making the future of AI exciting and accessible to everyone.
Read More :
TaskWeaver: Create LLM-Based Autonomous AI Agents
What Are LLM Agents ? An Overview of Their Capabilities
AutoGen Applications : Retrieval Augmented Generation (RAG)
GPT Pilot : Step-by-Step Installation and Usage Guide


Discussion about this post