
Are you prepared to take your website to the next level? This article is crafted to guide you through the process of how to embed Custom GPTs to any website effectively.
This powerful strategy is designed to captivate your audience and significantly boost your conversion rates.
Join us as we unlock the full potential of Custom GPTs for your online platform. Together, we’ll delve into the transformative advantages and provide a step-by-step exploration of how this innovative technology can reshape your digital presence. Let’s get started.
1 The Benefits of Embedding Custom GPTs in Your Website
- Enhanced Customer Support: Custom GPTs can interact with customers in real-time, providing instant support, answering queries, and improving overall user satisfaction.
- Increased Efficiency: Automate routine tasks and responses, allowing your team to focus on more complex issues and projects, thus saving time and operational costs.
- Sales Generation: By qualifying leads through intelligent conversation, GPTs can guide users to products and services, boosting sales and improving conversion rates.
- Cost-Effectiveness: Embedding Your custom GPT is significantly cheaper than alternative solutions, offering a higher return on investment and reducing per-interaction costs.
- Customizable Interactions: Tailor the GPT to suit your brand voice and specific business needs, ensuring a unique and personalized user experience.
- Data-Driven Insights: Collect and analyze data from user interactions to better understand customer needs and refine your services or products.
- Always Available: Unlike human staff, a GPT chatbot is available 24/7, providing consistent service to users across different time zones without additional costs.
- Scalability: As your business grows, GPTs can easily handle increased volumes of interactions without the need for significant additional resources.
2 The Oi-Widget Solution
Harnessing the full potential of AI on your website isn’t just a futuristic dream it’s a reality you can achieve today with Oi-Widget.
This platform stands out in the sea of AI solutions, offering an unparalleled blend of customization, cost-efficiency, and user-friendliness.
Say goodbye to the exorbitant fees charged by many startups that can bleed your budget dry. With Oi-Widget, you’re tapping into the raw power of OpenAI’s API without the premium price tag.
Imagine having a virtual clone of yourself, tirelessly working round-the-clock, fielding queries, and providing tailored solutions to your website visitors.
That’s the kind of cutting-edge innovation Oi-Widget brings to your digital doorstep.
3 Benefits of using Oi-Widget Over Voiceflow:
- Affordability: Oi-Widget slashes costs by using the straightforward OpenAI API, avoiding the markup that other services often add.
- Ease of Use: Setting up your AI assistant is incredibly simple. With just a few clicks, you can add an OpenAI key and customize your widget without any coding know-how.
- Customization: From the greeting message to the chatbot’s memory, every aspect of the user interaction can be tailored to fit the unique needs of your business and your clients.
- Advanced Features: For a nominal fee, you can access advanced features like actions and remove watermarks, offering a professional look for a fraction of the usual cost.
- Personal Touch: The widget can be customized to reflect your brand’s style, whether that’s professional, witty, or empathetic, ensuring that every interaction feels personal and engaging.
- Powerful Prompts: By crafting effective prompts, you can guide the conversation, ensuring that your chatbot serves as an effective lead generator or support agent without the need for complex builders.
- Seamless Integration: Embedding the widget onto your website is as simple as copying and pasting a code snippet, making it accessible to even those with the most basic web development skills.
4 The Pricing Structure of Oi-Widget
Navigating through the pricing of AI chatbot services can be complex, but Oi-Widget simplifies this with a transparent and user-friendly approach. Here’s what you need to know about the cost of using this innovative tool:
The Free Version
- Oi-Widget offers a basic version of their chatbot widget at no cost. This allows you to embed and use the chatbot on your website without any financial commitment, making it accessible for businesses and individuals alike.
- You can enjoy full control over the prompts and actions of your chatbot, thanks to the service’s direct integration with OpenAI’s Assistants API.
- In contrast to many platforms that charge based on interaction volume, Oi-Widget ensures that costs are not a hurdle for you when implementing AI on your site.
The Pro Version
- If you need advanced features, such as custom actions or the option to remove the watermark, Oi-Widget offers a Pro version.
- This premium service comes with a modest monthly fee of $5, which supports the platform’s maintenance and development, ensuring it stays at the forefront of AI technology.
- Opting for the Pro version is an investment in your website’s functionality and user experience, offering more sophisticated capabilities for a relatively small fee.
By offering a base service for free and a reasonable fee for advanced features, Oi-Widget positions itself as a cost-effective solution for you to leverage the power of AI chatbots without a significant financial overhead.
5 Getting Started with Oi-Widget
let’s walk through the initial steps to harness these advantages using the Oi-Widget platform.
Step 1: Creating an Account on Oi-Widget
To begin, you’ll need to create your own account.
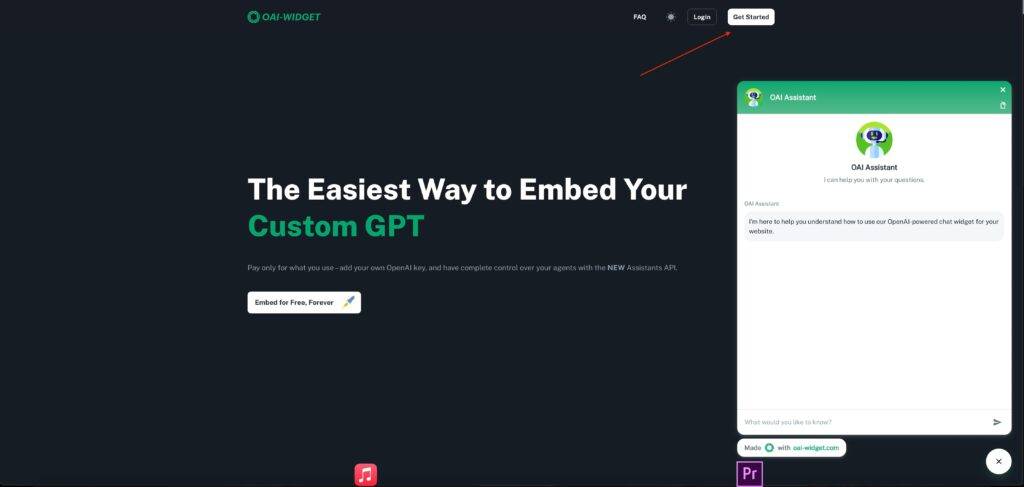
- Navigate to the Oi-Widget Homepage: As seen in the first screenshot, you’re greeted with a clear value proposition – “The Easiest Way to Embed Your Custom GPT.” Click on the ‘Get Started’ button prominently displayed on the page.
- Sign Up for Free: You’ll be taken to a sign-up page (as shown in the second screenshot). Here you can create an account for free by entering your first name, last name, email address, and a password. Alternatively, for a quicker setup, you can opt to sign in with Google.
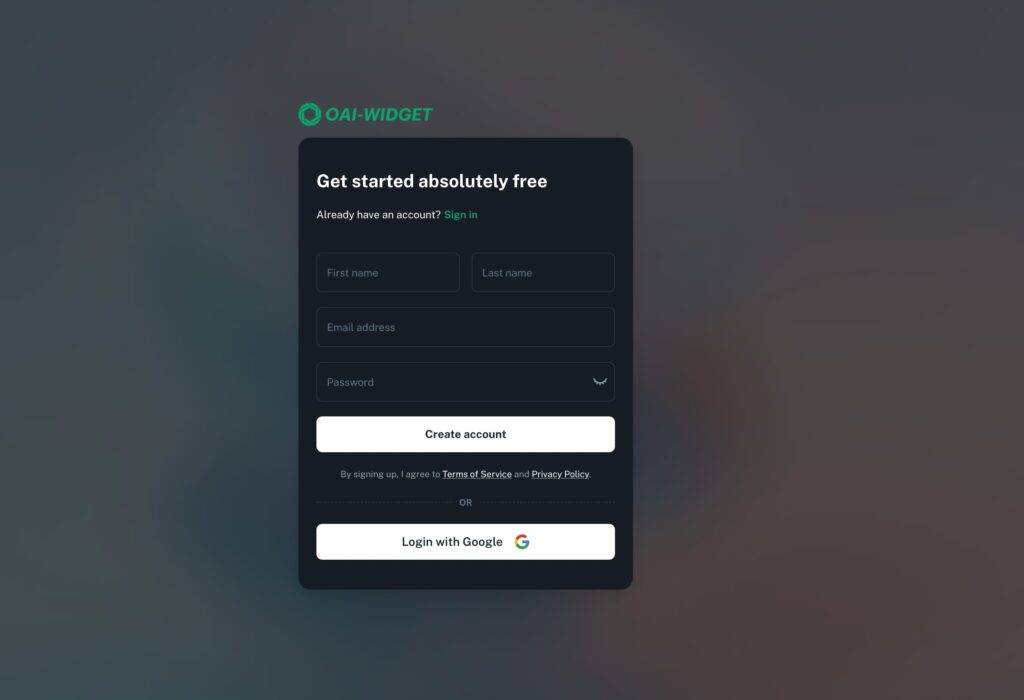
- Agree to the Terms: Before you can hit the ‘Create account’ button, make sure to read and agree to the Terms of Service and Privacy Policy.
Step 2: Understanding the Dashboard
Once your account is created, you’ll land on the dashboard, which will become your control center.
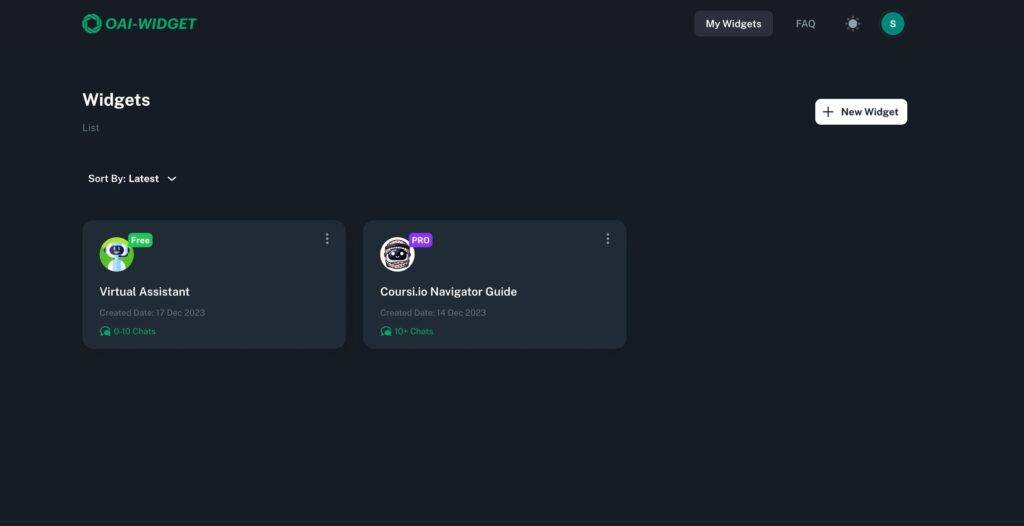
- Dashboard Overview: Here you can manage your widgets. You’ll see a ‘Widgets’ section that lists all your chatbot widgets, including both free and Pro versions.
- Widget Management: You can sort your widgets by latest, name, or number of chats. Each widget displays its name, creation date, and chat range, indicating how active it is.
- Adding a New Widget: To add a new widget, simply click the ‘+ New Widget’ button. This will allow you to start the process of creating a new AI assistant tailored to your needs.
After clicking on the ‘New Widget’ button, you’re ready to dive into the creation process for your chatbot assistant. Let’s continue with our step-by-step guide.
6 Crafting Your Chatbot Assistant (General Setup)
For the General Setup of your Oi-Widget chatbot, follow these steps to ensure your virtual assistant is both informative and engaging:
Assigning the Name
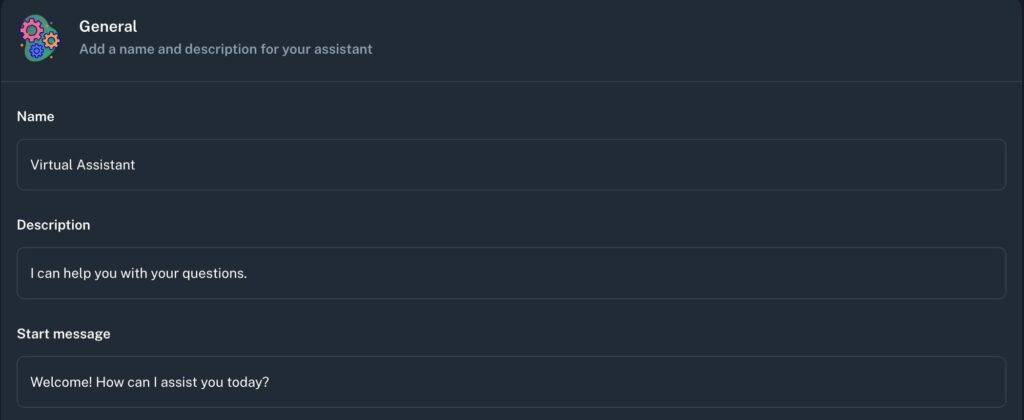
- Enter a name that is easily identifiable and relates to the bot’s function, like “Virtual Assistant”. This name will be the first thing users notice, so choose something that reflects your brand or the specific service the chatbot provides.
Crafting a Description
- Write a description for your assistant in the ‘Description’ box. This should be a brief explanation of what the chatbot does, such as “I can help you with your questions”. The description should set the right expectations for the user interaction.
Composing the Start Message
- In the ‘Start message’ field, create a friendly and welcoming message that prompts interaction, like “Welcome! How can I assist you today?” This message is your chatbot’s greeting and sets the tone for the conversation.
Input Placeholder Text

- The ‘Input placeholder’ is the text that appears in the chat input box before the user begins typing. It should be a call-to-action, such as “What would you like to know?” It serves as a hint to the users about what they can ask the chatbot.
Chat Persistence Option
- Choose your preferred ‘Chat Persistence’ setting. If you select ‘Never Forget’, the chatbot will remember the user’s past interactions, which is useful for providing a continuous experience if they return to the chat later. The other option, ‘Forget after tab closed or reloaded’, can ensure users start with a fresh conversation each time, which might be preferable for privacy reasons or for single-session use cases.
Positioning and Spacing
- Adjust where your chatbot appears on the screen. For ‘Position’, you can typically choose between the bottom right or left corners of your website. Then, set ‘Side Spacing’ and ‘Bottom Spacing’ in pixels to fine-tune its location on your page, ensuring it’s visible without obstructing content.
Powering Your Chatbot
- Decide if you want to display the ‘Powered By’ link. This option, usually toggled on by default, can help spread the word about the Oi-Widget platform but can be turned off for a cleaner look or if you’re using the Pro version.
7 Personalizing Appearance

Customizing the appearance of your chat widget is a vital step in aligning it with your brand’s aesthetic and making it inviting for users. Follow these steps to tailor the look of your chatbot:
Choosing the Main Color
- Select the ‘Main Color’ for your chat widget. This color should complement your website’s theme and brand palette.
Selecting the Launcher Icon
- Click on the ‘Launcher Icon’ section. You’ll want to choose an icon that is easily recognizable and prompts users to initiate a chat. The icon you pick will be the first visual cue users have to interact with your assistant, so it should be clear and inviting.
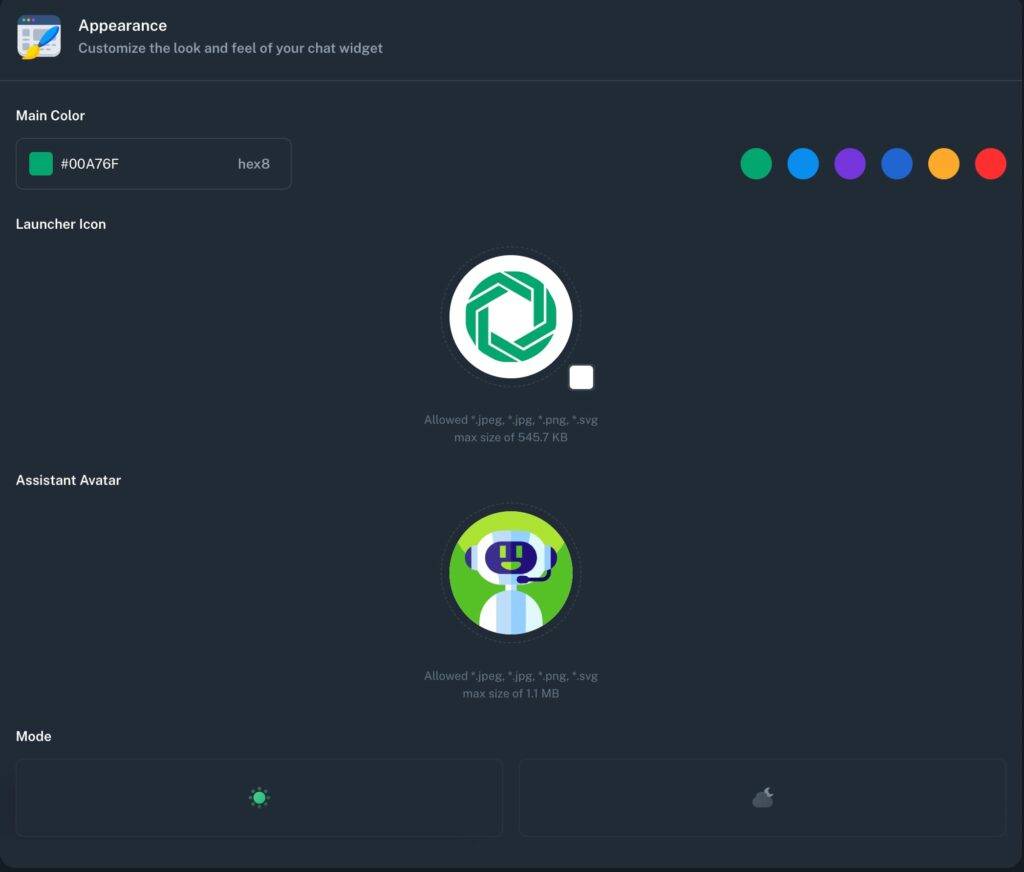
Uploading an Assistant Avatar
- For the ‘Assistant Avatar’, upload an image that represents your chatbot. This could be a brand mascot, a friendly face, or an abstract icon that resonates with your company’s image. The example shows a robot-like avatar, which is commonly associated with AI and technology.
Adjusting the Mode
- If available, select a ‘Mode’ for your widget’s appearance, such as light or dark. This should match the overall design of your website for consistency. For instance, a dark mode avatar on a light-themed website might stand out too much, whereas a light mode avatar could blend in seamlessly.
8 Integrating OpenAI
The integration of OpenAI with your chat widget is a critical step that will empower your assistant with cutting-edge AI capabilities. Here’s how to link your OpenAI account and choose the right AI model for your chatbot based on the provided screenshots:
Entering the API Key
- Locate the ‘API Key’ input box on the OpenAI settings page. If you haven’t already obtained an API key from OpenAI, you’ll need to do so by visiting the OpenAI website, creating an account or signing in, and navigating to the API section to generate a new key.
Naming the API Key
- When adding a new API key, give it a name that helps you remember the associated project or website, like “MyWebsite Chatbot”.
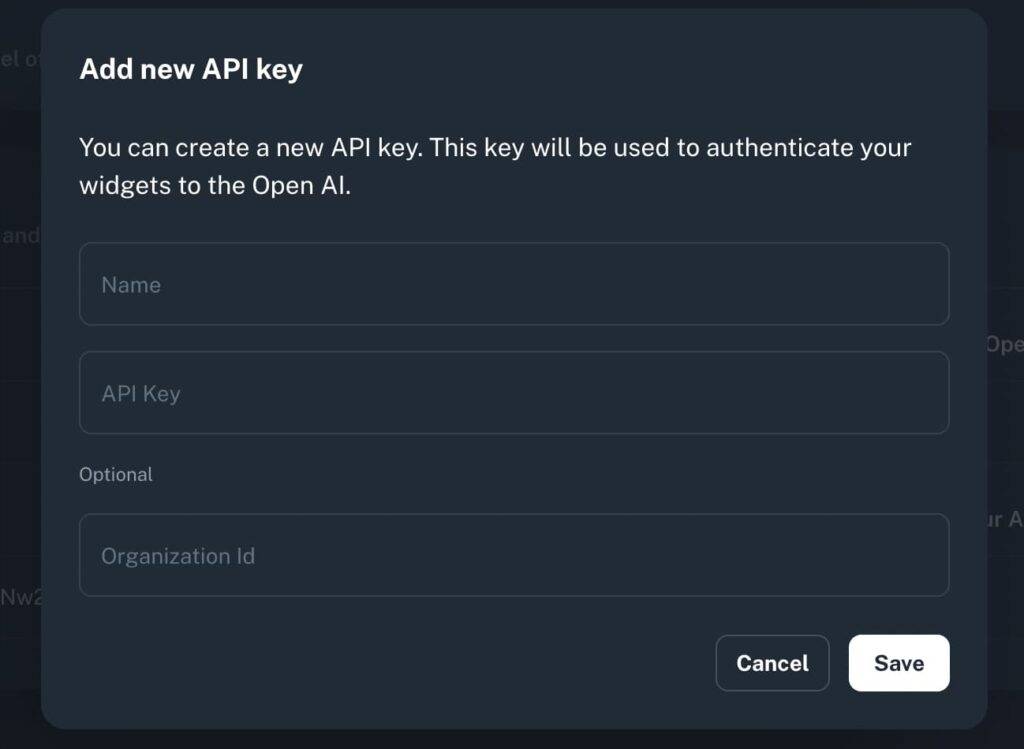
Providing the API Key
- Paste the generated API Key from OpenAI into the ‘API Key’ field. This is the unique identifier that allows your widget to communicate with OpenAI’s servers.
Choosing an Assistant
- After entering the API Key, select an ‘Assistant’ from the dropdown menu. If you haven’t created an Assistant yet, you can do so by selecting ‘Add new’. This will take you through the process of setting up a new Assistant, where you can customize its behavior according to your needs.
9 Creating and Integrating a New OpenAI Assistant
Once you’ve selected to add a new assistant within your Oi-Widget interface, you’ll be presented with several fields and options to configure your AI assistant. Based on the screenshots, here’s a breakdown of the steps you’ll need to take:
Naming Your Assistant
- Enter a distinct name for your assistant in the ‘Name’ field, such as “Coursi.io Navigator Guide”. This should be representative of the assistant’s purpose or the domain it will be serving.
Describing Your Assistant
- Provide a concise ‘Description’ that encapsulates the assistant’s role. You can write something like “Guides users through course selections and provides information on demand”.
Providing Instructions
- Fill in the ‘Instructions’ section with clear directives for your assistant. These instructions are crucial as they dictate how the assistant will interact with users. For example, “Assist users in finding courses by answering their queries and directing them to relevant sections of the website.

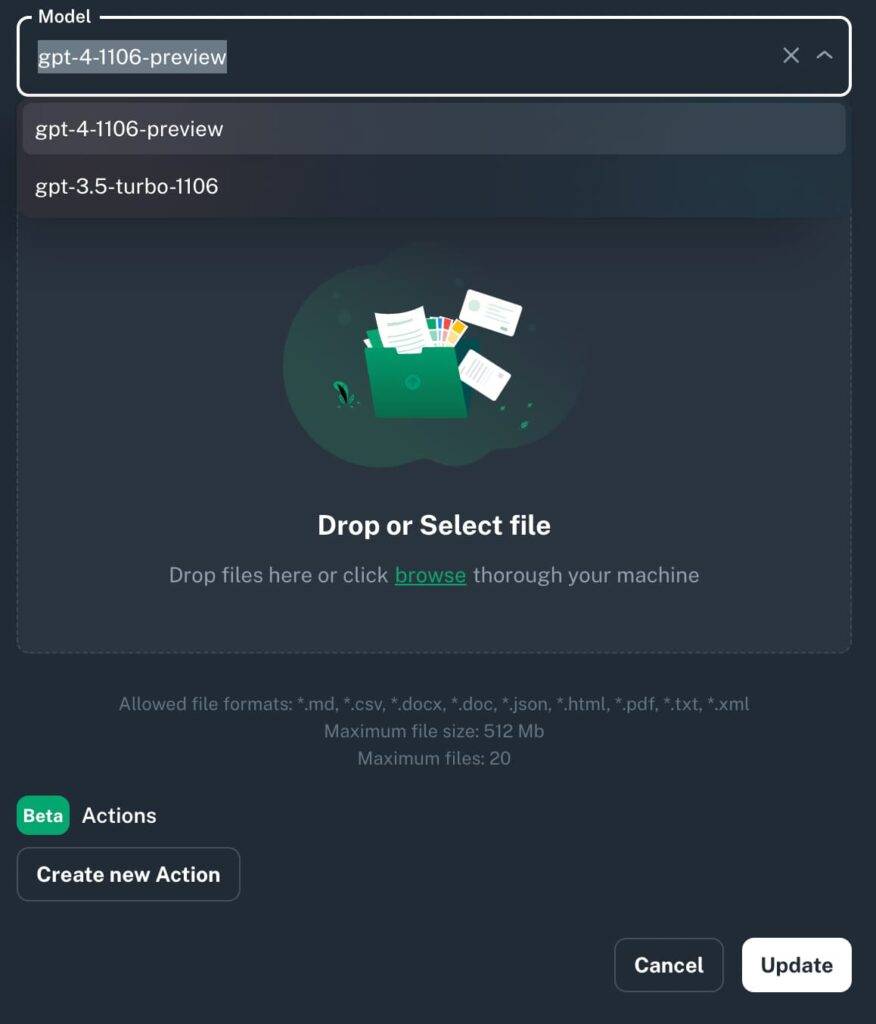
Selecting the Model
- From the ‘Model’ dropdown, select the version of GPT you wish to use, such as ‘gpt-4-1106-preview’. The model you choose will determine the capabilities and the nature of responses from your assistant.
Uploading Knowledge Files
- Under the ‘Knowledge’ section, you can upload any relevant files that contain information your assistant should reference. These could be FAQ documents, product details, or any other content that will enable the assistant to provide informed responses.
Creating New Actions (Optional)
- If you require the assistant to perform specific tasks, like fetching user details or providing personalized recommendations, you can create new actions by clicking ‘Create new Action’. You’ll need to provide a schema and details for each action, so the assistant understands when and how to perform them.
Applying and Saving
- Once you’ve configured the settings, click ‘Save’ to finalize the creation of your assistant. If you’re satisfied with the setup, you can immediately proceed to test your assistant within the widget to ensure it’s operating as expected.
10 Embedding Your Chatbot
After configuring and saving your assistant, you are ready to embed the chatbot into your website. Here are the steps to follow:
Accessing the Embed Code
- Go to your dashboard where your chatbot widgets are listed.
- Locate the widget you want to embed and click on the three dots to expand the options menu.
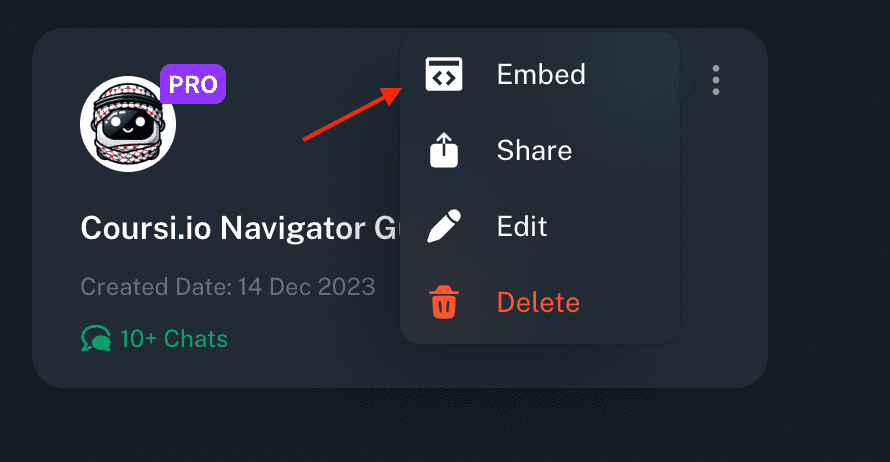
Copying the Embed Code
- Choose ‘Embed’ from the menu to open the window containing the embed code. This code is a script that, when placed into your website’s HTML, will load and display your chat widget.
Placing the Code on Your Website
- Copy the entire script provided in the embed window.
- Paste this script into the
<head>or at the beginning of the<body>section of your website’s HTML code. This will ensure that the chat widget loads correctly on your site.
Testing the Widget
- After embedding the code, save your changes and refresh your website.
- Check to see that the chat widget appears in the correct position on your site and that it initializes properly.
- Interact with the chatbot to ensure that it is responding as expected.
Troubleshooting
- If the widget does not appear or does not function correctly, review the code to ensure it was copied and pasted correctly without any modifications.
- Verify that there are no JavaScript errors in your website’s console that could be interfering with the widget’s operation.
By embedding the chatbot into your website, you offer users an interactive and engaging experience that can answer their questions, guide them through your site, and assist them in real-time. This added functionality can enhance user satisfaction and increase the likelihood of conversions or further interactions with your site.
11 Conclusion
With Oi-Widget, you’re set to harness the evolving capabilities of the OpenAI API, staying ahead in the dynamic field of AI chatbots.
While you explore these advanced features, Remember to take advantage of the coupon code (1 month free 🎟️ COUPON: 0PUCWSYC), but do check in case it has expired.
Embrace this opportunity to elevate your website’s interactivity and user engagement effortlessly.


Discussion about this post