

Have you ever wished for a tool that could simplify the process of web application development? A tool that could understand your needs and translate them into functional code? Well, your wish has been granted! Meet the Deploy Script ChatGPT Plugin, a revolutionary tool that’s transforming the way we approach coding.
in this comprehensive guide, we’ll take a deep dive into the world of the DeployScript ChatGPT Plugin. We’ll explore its features, understand its workings, and see it in action. Whether you’re a seasoned developer or a newbie stepping into the world of coding, this guide is designed to help you navigate the exciting landscape of conversational coding.
What is DeployScript Chatgpt Plugin?
DeployScript is a groundbreaking tool that’s changing the game in web application development. But what exactly is it? In simple terms, DeployScript is a plugin for ChatGPT, a powerful language model developed by OpenAI. This plugin allows you to have a conversation with the model, just like you would with a developer, and it translates your ideas into functional code.

Imagine you want to create a trendy gradient generator for your website. With DeployScript, you can simply describe your vision, and the plugin will generate the code for you. It’s like having a personal developer at your fingertips!
How DeployScript Plugin Works
Now that we know what DeployScript is, let’s delve into how it works. DeployScript leverages the capabilities of ChatGPT to understand your prompts and generate the corresponding code. It’s like having a conversation with a developer. You describe what you want, and DeployScript writes the code.

However, there’s one important thing to note. DeployScript, like ChatGPT, operates within a token limit imposed by OpenAI. This means that if your request is too complex or lengthy, the plugin might run out of tokens and keep looping without generating the desired output. But don’t worry, there are ways to work around this, which we’ll discuss later in this guide.
Exploring the Core Functions of DeployScript
createApp Function
The createApp function is one of the core features of DeployScript. It’s the starting point for your application development journey. By using this function, you can create a new application resource with a unique identifier. This function is the first step in bringing your vision to life.
const createAppResponse = await deployscript.createApp();
const appId = createAppResponse.appId;
let’s imagine you’re using the createApp function to build a gradient generator. You’d start by outlining your idea for the generator. You want it to have four color selectors to create a sleek and modern gradient. Once you’ve detailed this vision, DeployScript takes over, turning your concept into a working application.
getApp Function
The getApp function is another crucial feature of DeployScript. It allows you to retrieve an existing application resource using its unique identifier. This function is particularly useful when you want to make modifications or updates to your application.
const getAppResponse = await deployscript.getApp({ appId: "your-app-id" });
For example, if you wanted to add a new feature to your gradient generator, you could use the getApp function to retrieve the existing application. Then, you could use the updateFile function to make the desired changes.
uploadFile Function
The uploadFile function in DeployScript allows you to add an HTML, CSS, JavaScript, or JSON file to your application. This function is essential when you want to add pre-existing code or additional features to your application.
const specialEffectScript = `
// Your pre-written JavaScript code for the special effect goes here
`;

const uploadFileResponse = await deployscript.uploadFile({
  appId: "your-app-id", // Replace with your actual app ID
  fileType: "js",
  fileName: "specialEffect.js",
  content: specialEffectScript,
});
For instance, if you had a pre-written JavaScript file that added a special effect to your gradient generator, you could use the uploadFile function to include this file in your application.
updateFile Function
The updateFile function is a powerful feature of DeployScript that allows you to modify an existing file in your application. This function is particularly useful for making iterative changes or updates to your application.
const updatedHtmlContent = `
<!-- Your updated HTML content with the fifth color selector goes here -->
`;

const updateFileResponse = await deployscript.updateFile({
  appId: "your-app-id", // Replace with your actual app ID
  fileType: "html",
  fileName: "index.html",
  content: updatedHtmlContent,
});
let’s consider a scenario where you want to enhance your gradient generator by adding a fifth color selector. You would articulate this change, and DeployScript would use the updateFile function to modify the relevant file, incorporating the new color selector. This scenario underscores the adaptability and ease-of-use of DeployScript, allowing you to effortlessly tailor your application to meet your needs.
How to Use DeployScript
Setting Up DeployScript
Setting up DeployScript is a simple process, but it’s important to follow the steps correctly to ensure a seamless development experience. Here’s an updated step-by-step guide on how to do it:
- Search for DeployScript: The first step is to find DeployScript in the plugin store. With the new search bar feature, you can simply type “DeployScript” into the search bar and hit enter.
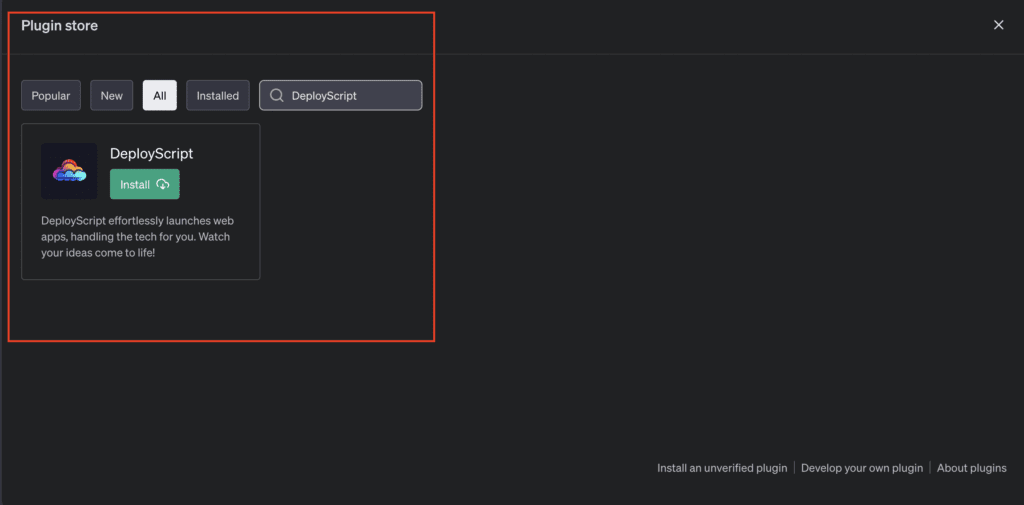
- Install DeployScript: Once you’ve found DeployScript, click on the “Install” button to add it to your ChatGPT interface. .
- Create an Account: After the installation, you’ll need to create an account. This is a crucial step as it allows DeployScript to save your projects and settings. Follow the prompts to create your account.
- Authenticate: Once your account is created, you’ll need to authenticate. This step links your account with DeployScript, allowing you to use the plugin.
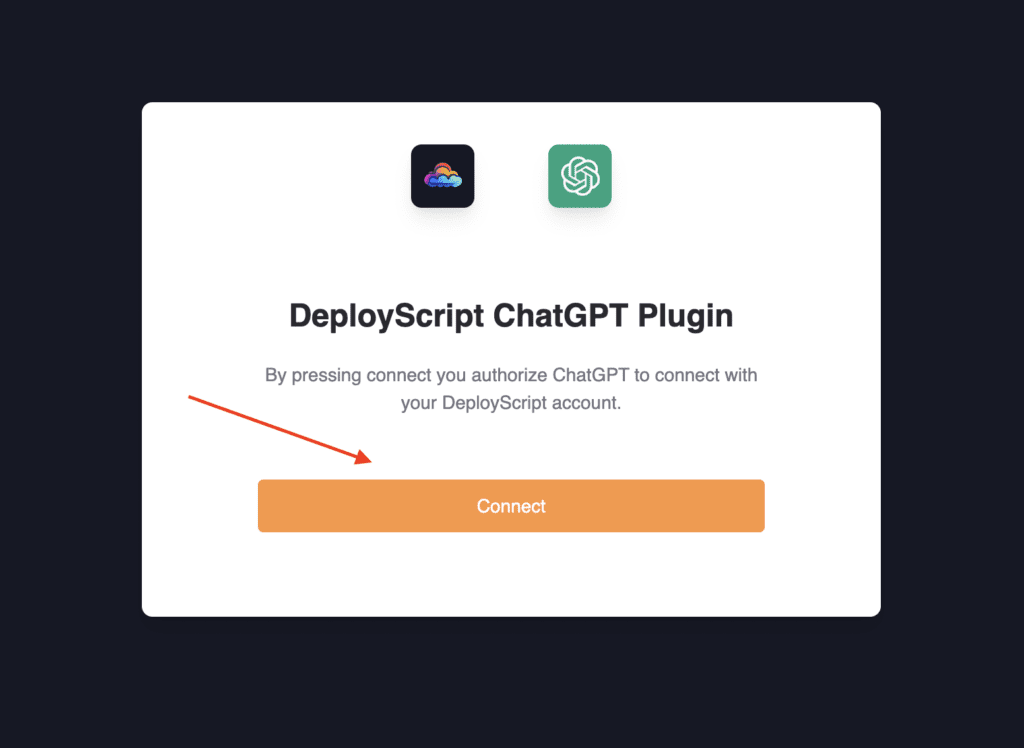
- Redirect to ChatGPT Interface: After authentication, you’ll be redirected back to the ChatGPT interface. Now, you’re all set to start using DeployScript!
- Start a Conversation: With DeployScript installed and authenticated, you’re ready to start developing. Remember, DeployScript is a conversational coder, so you can start by simply describing the application you want to create. For example, you could say, “I want to create a gradient generator with four color selectors.”
While setting up DeployScript is generally straightforward, there are a few common pitfalls to be aware of. One of these is the token limit imposed by OpenAI. If your request is too complex or lengthy, DeployScript might run out of tokens and keep looping without generating the desired output. If this happens, you might need to simplify your request or break it down into smaller parts.
I’m excited to announce the 1st ChatGPT plugin @digitalconner and I made is LIVE in the ChatGPT plugin store!!
— BowTiedSystems | Sales System | Sales productivity (@BowTiedSystems) May 26, 2023
Give it a shot by following this video!
Now you can Deploy code generated by ChatGPT without leaving ChatGPT!
What will you make? 🤔
Comment what you’ll make👇 https://t.co/4aW7JAzrB7 pic.twitter.com/UeaXWFYmVe
Pricing and Plans for DeployScript
DeployScript offers two plans to cater to different user needs: a Free Plan and a Pro Plan. Each plan comes with its own set of features and capabilities.
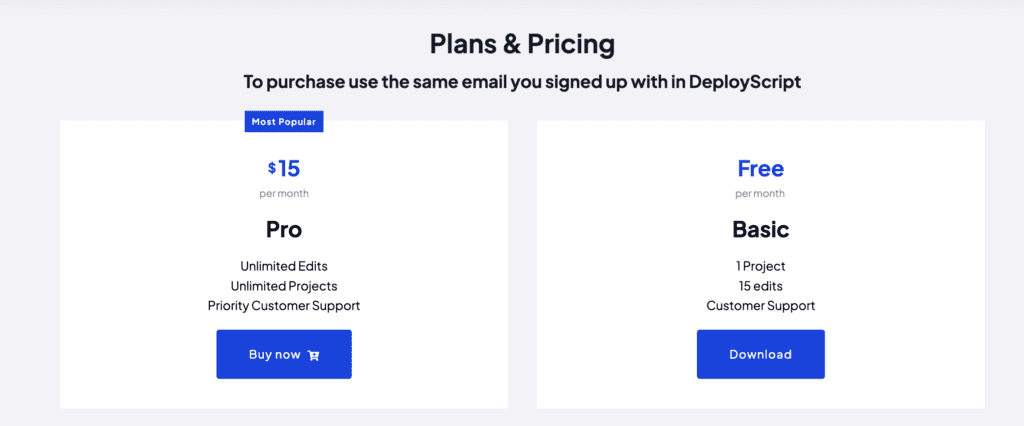
Free Plan
The Free Plan is a great starting point for those new to DeployScript. It allows users to create one project and make up to 15 edits. This plan is perfect for those who want to explore the capabilities of DeployScript and undertake small projects.
Pro Plan
For more extensive use, DeployScript offers the Pro Plan at $15 per month. This plan is designed for users who require more flexibility and resources for their projects. Here’s what you get with the Pro Plan:
-
Unlimited Edits: With the Pro Plan, you’re not restricted to a certain number of edits. You can modify your projects as many times as you need, providing you with the flexibility to refine and perfect your applications.
-
Unlimited Projects: The Pro Plan allows you to create as many projects as you want. Whether you’re a prolific developer or a business with multiple web application needs, this feature ensures that you’re not limited by the number of projects you can create.
-
Priority Customer Support: Pro Plan users get priority customer support. This means that if you encounter any issues or need assistance, your queries will be addressed before those of free users, ensuring faster resolution and minimal disruption to your work.
Best Practices for Using DeployScript
As you become more comfortable with DeployScript, it’s important to understand some best practices to get the most out of this powerful tool. Here are some expert tips, along with common mistakes to avoid:
- Be Conversational: Treat DeployScript like a conversation with a developer. Clearly describe what you want, and DeployScript will translate your vision into code. This approach can help you create more effective prompts and get better results.
- Be Specific: The more specific you are in your descriptions, the better DeployScript can understand your needs. Try to provide as much detail as possible about the application you want to create or the changes you want to make.
- Break Down Complex Requests: If your request is complex, try breaking it down into smaller parts. This can help avoid hitting the token limit and ensure that DeployScript can effectively process your request.
- Experiment and Iterate: Don’t be afraid to experiment with different descriptions and requests. The more you use DeployScript, the better you’ll get at communicating your needs. And if something doesn’t work the first time, try tweaking your description or request and try again.
- Use the Right Function for the Task: DeployScript offers several functions, each designed for a specific task. Make sure you’re using the right function for what you want to do. For example, use the createApp function to create a new application, the getApp function to retrieve an existing application, the uploadFile function to add a file to your application, and the updateFile function to modify an existing file.
Effective ChatGPT Prompts for DeployScript
DeployScript works best when you treat it like a conversation with a developer. Here are some effective prompts that you can use to communicate your needs and get the most out of DeployScript:
-
Creating a New Application: “I want to create a new web application that displays a welcome message to the user.”
-
Retrieving an Existing Application: “Please retrieve the application with the ID ‘12345’.”
-
Adding a File to an Application: “I want to add a CSS file to my application to style the welcome message.”
-
Modifying an Existing File: “I want to change the welcome message in my application to ‘Hello, World!’.”
-
Creating a Complex Application: “I want to create a web application that allows users to upload images, apply filters to them, and download the edited images.”
Enhancing DeployScript with Prompt Perfect ChatGPT Plugin
While DeployScript is a powerful tool on its own, its capabilities can be further enhanced when used in conjunction with other plugins. One such plugin is the Prompt Perfect ChatGPT Plugin.
The Prompt Perfect ChatGPT Plugin refines user inputs, transforming them into clearer, more specific, and contextually appropriate prompts. This can be particularly useful when using DeployScript, as it can help create better prompts that more accurately convey your needs to the plugin. By using these two plugins together, you can ensure a more efficient and effective web development process.
Understanding the Limitations of DeployScript
Like all tools, DeployScript comes with its own set of limitations, and understanding these can help users navigate and utilize the tool more effectively.
OpenAI Plugin Token Limit
One of the primary constraints of DeployScript is the token limit set by OpenAI for plugins. If the code or script that users are trying to generate exceeds a certain number of tokens, DeployScript may find itself in a continuous loop, repeatedly trying to deploy the code without success.
Additionally, DeployScript currently does not support task chunking. This means that users cannot instruct ChatGPT to break down code or tasks into smaller, more manageable chunks for deployment.
At present, these limitations are part of the tool’s design and cannot be easily circumvented. However, it’s worth noting that users are constantly exploring and finding workarounds to these challenges.
Continuous Loading Issue
Another common issue that users may encounter with DeployScript is the continuous loading loop. This typically happens when a task exceeds the token limit. In such cases, DeployScript can get stuck in a loop, endlessly loading without completing the task.
Troubleshooting Common Issues
Like any tool, DeployScript can sometimes present challenges. However, most common issues can be resolved with a bit of troubleshooting. Here’s a guide on how to address some of these issues:
- Token Limit Reached: try simplifying your request or breaking it down into smaller parts, you can also try creating a new chat or changing your request.
- Unexpected Output: If DeployScript is generating code that doesn’t match your expectations, it might be due to the way you’re describing your request. Remember, DeployScript works best when you treat it like a conversation with a developer. Try to be as specific and detailed as possible in your descriptions. High-Quality Prompt = High-Quality Deployment
Conclusion
In conclusion, DeployScript is a powerful tool that revolutionizes the way we approach web application development. Its conversational coding approach simplifies the process, making it accessible to both beginners and experienced developers. Whether you’re looking to create a new application or modify an existing one, DeployScript offers a convenient and efficient solution. For more information, visit the official DeployScript website at https://deployscript.com/.
Related Article : GPT Engineer : Comprehensive Guide to Easy Setup & Use


Discussion about this post