
In the rapidly evolving world of artificial intelligence, there’s one name that’s been making waves recently: AutoGPT. But what exactly is AutoGPT, and why should you care? Imagine having a personal AI assistant that can autonomously perform tasks, from drafting emails to managing your schedule, all with minimal input from you. Sounds like science fiction, right? Well, with AutoGPT, this futuristic scenario is closer to reality than you might think.
That’s where this guide comes in. In this blog post, we’ll walk you through a step-by-step installation guide for AutoGPT. Whether you’re a seasoned AI enthusiast or a curious beginner, this guide will provide you with the knowledge you need to get AutoGPT up and running. So, are you ready to step into the future with AutoGPT? Let’s get started!
Prerequisites
Before we dive into the installation process, it’s important to ensure that your system meets the necessary prerequisites for running AutoGPT. This will help ensure a smooth and successful installation process. Don’t worry, we’ll break down each requirement and explain why it’s important.
Docker (Recommended)
Depending on your preferred method of installation, you’ll need either Docker or Git:
Docker: Docker is a platform that makes it easier to develop, ship, and run applications. It allows you to package up an application with all of the parts it needs, such as libraries and other dependencies, and ship it all out as one package.

While Docker is not strictly necessary for running AutoGPT, it’s highly recommended as it simplifies the installation process and helps manage dependencies. You can download Docker from the Docker website. Once installed, you can verify the installation by typing docker –version in your terminal.
Visual Studio Code (Recommended)
While not strictly necessary for running AutoGPT, this guide assumes that you are using Visual Studio Code (VS Code) as your code editor. VS Code is a free, open-source code editor that is highly customizable and includes features like debugging, syntax highlighting, intelligent code completion, snippets, and code refactoring. It also integrates with Git for version control and can be extended with plugins to support a wide range of programming languages and frameworks.

You can download VS Code from the VS Code website. After installation, you can open it and familiarize yourself with its interface. This guide will provide instructions assuming you are using VS Code’s built-in terminal for command line operations.
OpenAI Account:
You’ll need an account with OpenAI to generate an API key. This key is essential for Auto GPT to function. Don’t worry if you don’t have one yet; we’ll guide you through the process of setting it up.
Setting Up Docker
Docker is a crucial component in the setup process for Auto GPT. It’s a platform that allows us to run applications like Auto GPT in an isolated environment called a container. This ensures that Auto GPT runs smoothly and doesn’t interfere with other software on your system. Let’s get Docker set up on your computer.
A. Downloading Docker
-
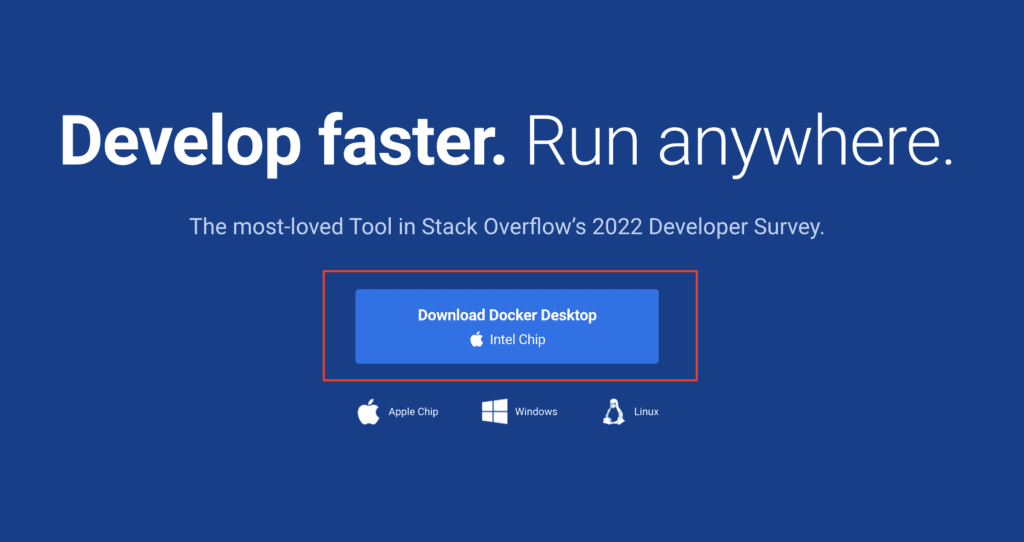
Visit the Docker website: The first step is to navigate to the Docker website. You can do this by clicking here.
-
Choose your operating system: Docker is available for both Windows and Mac. Select the version that corresponds to your operating system.
-
Download Docker: Click on the “Get Docker” button to start the download process. The Docker installer will be downloaded to your system.
B. Installing Docker
-
Locate the installer: Once the Docker installer has been downloaded, locate it in your system’s downloads folder.
-
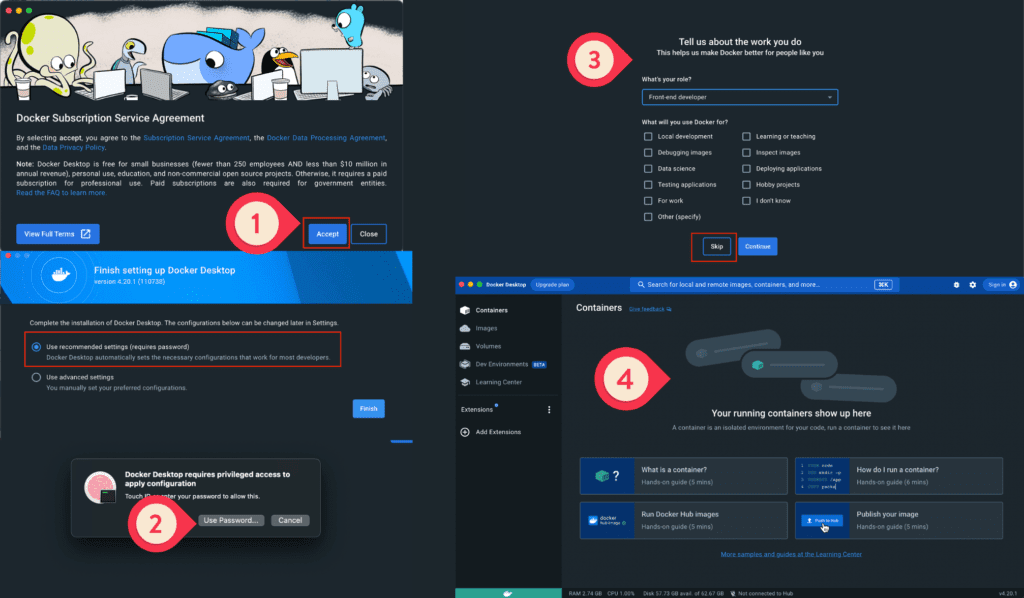
Run the installer: Double-click on the Docker installer to begin the installation process.
-
Follow the prompts: The Docker installer will guide you through the installation process. Accept the terms and conditions, and follow the prompts to install Docker on your system.
-
Launch Docker: Once the installation is complete, launch Docker. On a Mac, you can do this by finding Docker in your Applications folder and double-clicking on it. On Windows, you can find Docker in your Start menu.
-
Verify the installation: To ensure Docker has been installed correctly, open your Terminal (Mac) or Command Shell (Windows) and type
docker version. This command should display the version of Docker that has been installed on your system.
Getting the API Key
The API key is a unique identifier that allows Auto GPT to communicate with OpenAI’s servers and access the GPT-3 model. Here’s how you can get your API key:
A. Creating an OpenAI Account
-
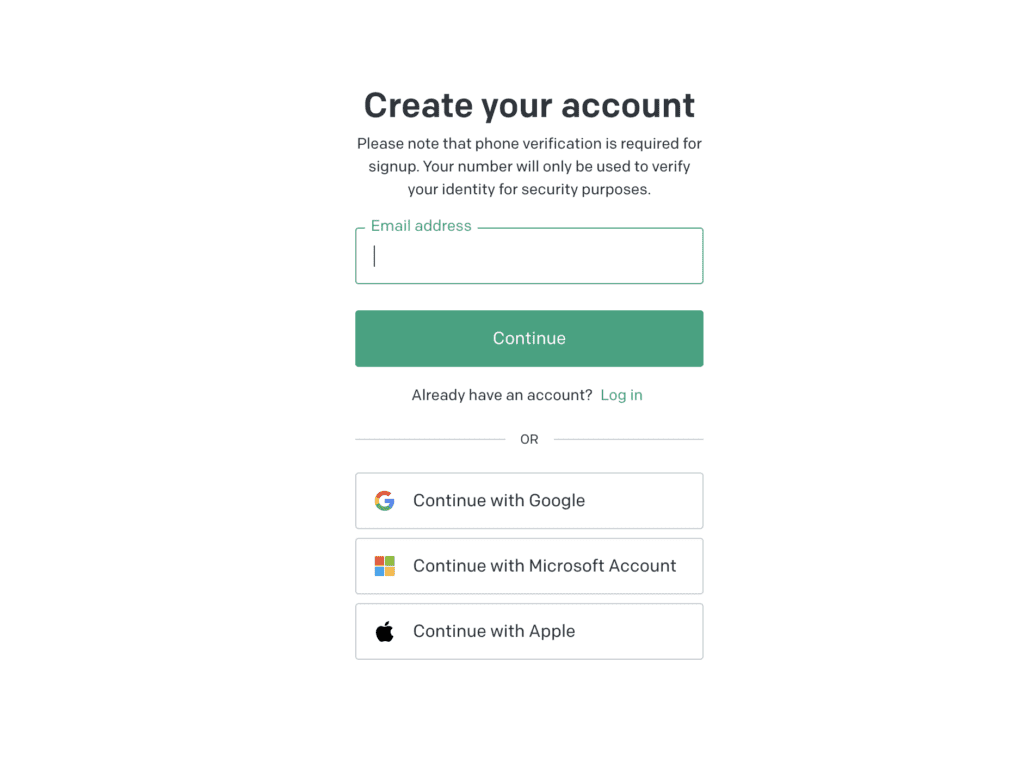
Visit the OpenAI website: Navigate to the OpenAI website by clicking here.
-
Sign up for an account: If you don’t already have an account, click on the “Sign Up” button and fill out the required information. If you already have an account, simply log in.
B. Generating the API Key
-
Navigate to the API section: Once you’re logged into your OpenAI account, click on the “API” section in the dashboard.
-
Create a new key: Click on the “Create New Key” button. You’ll be prompted to name your key. You can name it something like “Auto GPT” for easy reference.

-
Copy the key: After creating the key, it will be displayed on your screen. Make sure to copy it immediately, as you won’t be able to view the entire key again for security reasons. Store this key in a safe place, as you’ll need it later in the setup process.
C. Setting Up Billing
While OpenAI does charge for the use of its API, it provides a generous free tier that should be sufficient for most users. However, it’s still important to set up your billing information:
-
Navigate to the Billing section: In your OpenAI dashboard, click on the “Billing” section.
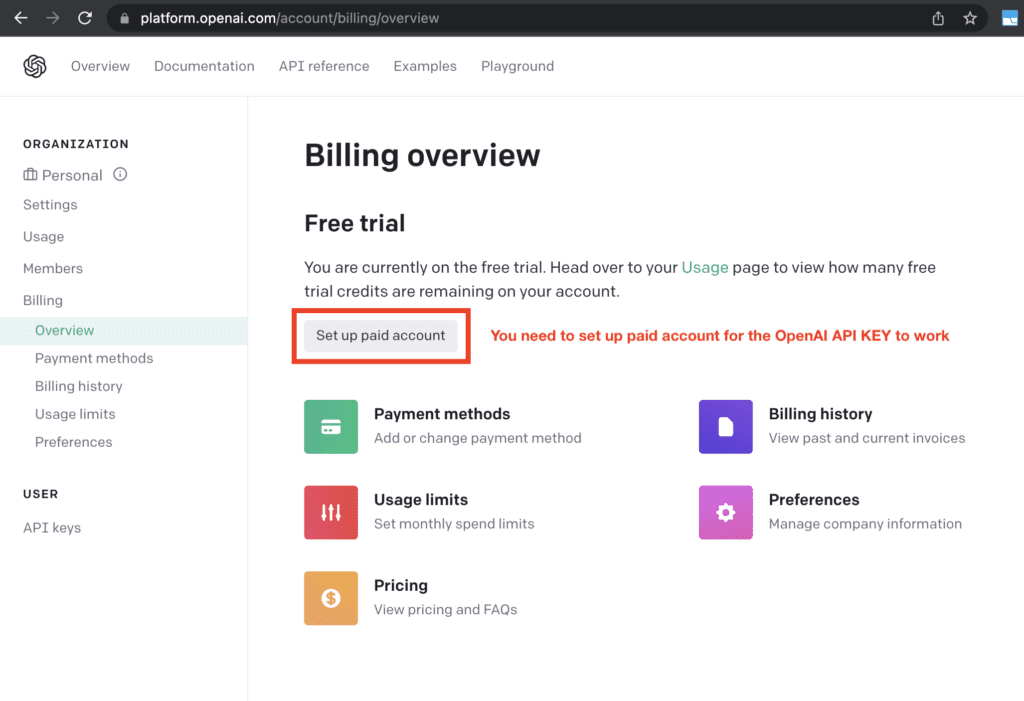
-
Enter your payment information: Fill out the required fields with your payment information.
-
Set a usage limit: To prevent unexpected charges, you can set a usage limit. By default, OpenAI sets a hard limit of $120 per month, but you can adjust this to fit your needs.
Setting Up Auto GPT
Now that we have Docker installed and the API key from OpenAI, we can proceed to set up Auto GPT. This involves creating a specific folder structure and files that Auto GPT will use.
Pulling the Auto GPT Docker Image
the next step is to pull the Auto GPT Docker image. This image contains the pre-packaged application and all its dependencies, ready to be run by Docker.
-
Open Terminal or Command Shell in VS Code: In VS Code, you can open a Terminal or Command Shell by going to the “Terminal” menu and selecting “New Terminal”. This will open a Terminal or Command Shell at the bottom of the VS Code window.
-
Pull the Auto GPT Docker image: In the Terminal or Command Shell, type the following command and press Enter:
docker pull significantgravitas/auto-gptThis command tells Docker to download (or “pull”) the Auto GPT Docker image from Docker Hub, which is a repository of Docker images. The image is named “significantgravitas/auto-gpt”.

-
Wait for the image to download: Docker will now download the Auto GPT Docker image. This may take a few minutes depending on your internet speed. You’ll see Docker downloading several layers of the Docker image. Once it’s done, you’ll see a message indicating that the image has been successfully pulled.
Creating the Auto GPT Folder and Docker Compose File
- Open Terminal or Command Shell: On Mac, you can find Terminal by searching for it in Spotlight (press Command + Space and type “Terminal”). On Windows, you can find Command Shell by searching for “cmd” in the Start menu.
- Create the Auto GPT folder: In Terminal or Command Shell, type the following commands to create a new folder named “Auto GPT”:
mkdir Auto-GPT
cd Auto-GPT
These commands create a new folder named “Auto GPT” and then navigate into that folder.
-
Open Visual Studio Code (VS Code): With the Terminal or Command Shell still open, type
code .and press Enter. This will open VS Code with the “Auto GPT” folder. -
Create the Docker Compose file: In VS Code, go to the “File” menu and select “New File”. Name this file “docker-compose.yml”. This file will contain the configuration for Docker to run Auto GPT.
-
Enter the Docker Compose content: Copy the Docker Compose content from the Auto GPT setup guide and paste it into the “docker-compose.yml” file in VS Code. The content should look like this:
version: "3.9"
services:
auto-gpt:
image: significantgravitas/auto-gpt
env_file:
- .env
profiles: ["exclude-from-up"]
volumes:
- ./auto_gpt_workspace:/app/autogpt/auto_gpt_workspace
- ./data:/app/data
- ./logs:/app/logs
Save the Docker Compose file: After entering the Docker Compose content, save the “docker-compose.yml” file by going to the “File” menu and selecting “Save”.
Configuring Auto GPT
Now that we have our Docker Compose file set up, it’s time to download and configure the Auto GPT code. This code is what allows Auto GPT to function, and it’s stored on a platform called GitHub.
A. Downloading the Auto GPT Code
Navigate to the Auto GPT GitHub page: Open your web browser and go to the Auto GPT GitHub page. You can access it by clicking here.
Locate the latest release: On the GitHub page, scroll down until you see a section titled “Latest Release”. This section contains the most recent version of Auto GPT. The developers of Auto GPT regularly update the code, so it’s important to download the latest release to ensure you have the most up-to-date features and improvements.
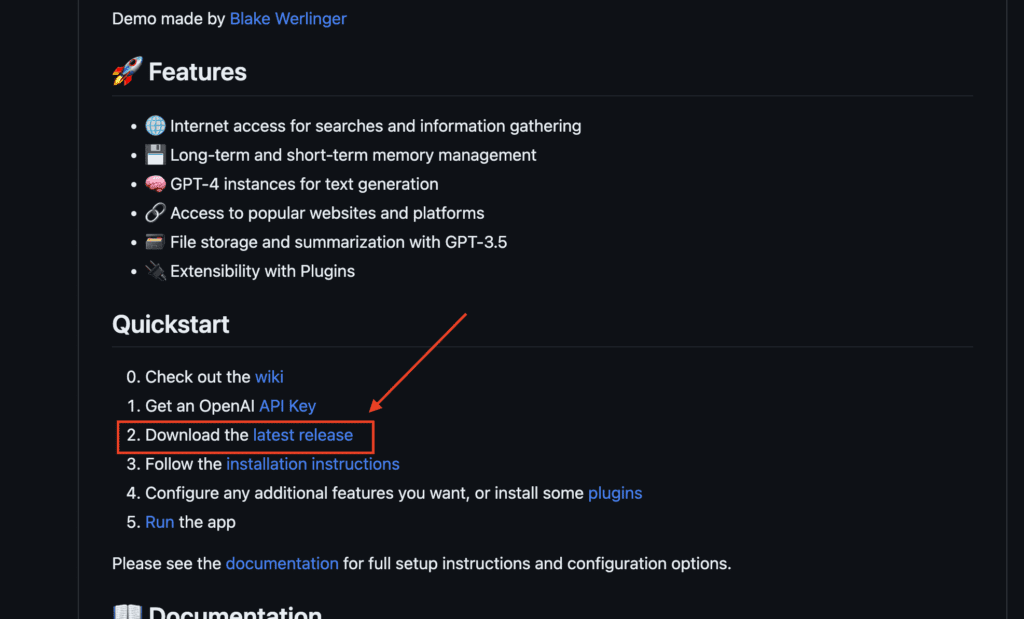
Download the source code: Under the “Latest Release” section, you’ll see a link to download the source code. Click on this link to start the download. The source code will be downloaded as a ZIP file.
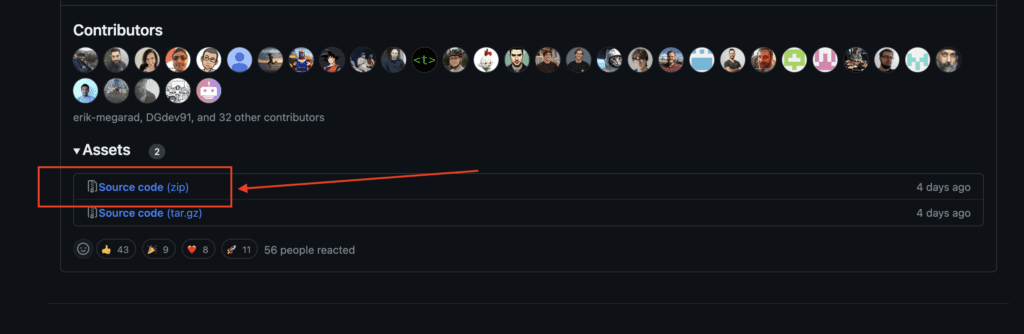
Extract the ZIP file: Once the download is complete, locate the ZIP file in your downloads folder and extract it. On most systems, you can do this by right-clicking on the ZIP file and selecting “Extract All” or “Unzip”. This will create a new folder containing the Auto GPT code.
Move the extracted folder to the Auto GPT folder: To keep everything organized, move the extracted folder (which contains the Auto GPT code) into the “Auto GPT” folder you created earlier in VS Code.
Explanation of the Configuration Process
The configuration process involves setting various parameters that control how AutoGPT operates. These parameters include things like your OpenAI API key, the port that AutoGPT listens on, and various settings that control how AutoGPT generates text.
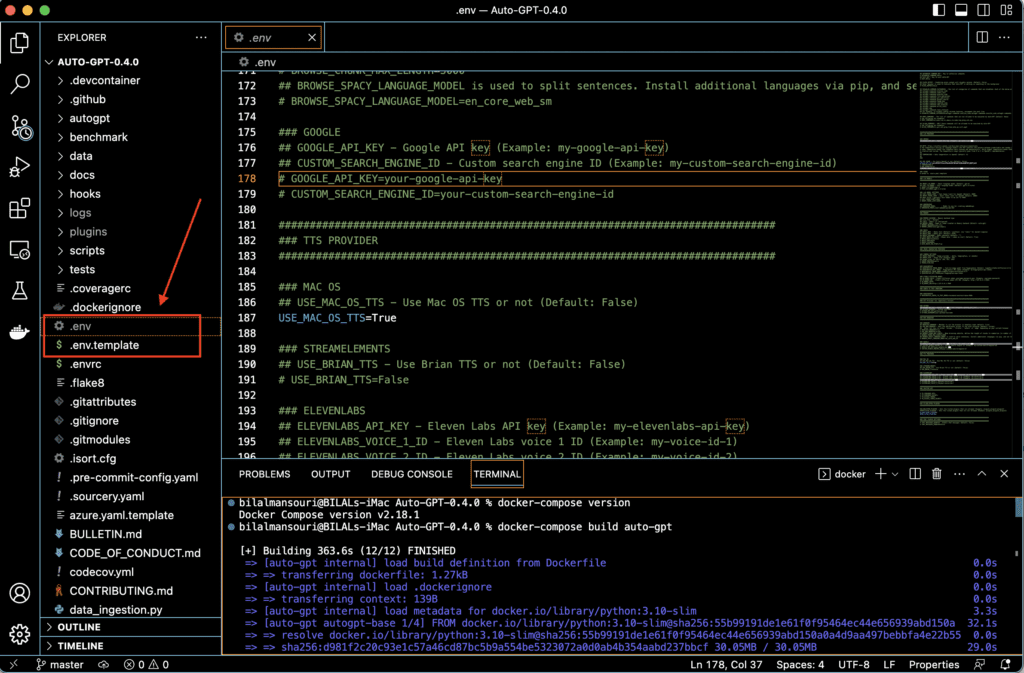
The settings for Auto GPT are stored in a file named “.env.template”, which is located in the root directory of the Auto GPT project. When Auto GPT starts up, it reads this file and uses the settings within to configure its behavior.
If you’re using Visual Studio Code, you can easily view and edit this file.
To configure your own settings, you need to create a copy of the “.env.template” file and rename it to “.env”.
Here’s how you do it:
-
-
- Open the “.env.template” file in Visual Studio Code.
- Copy all the content in the “.env.template” file.
- Create a new file in the same directory and name it “.env”.
- Paste the copied content into the “.env” file.
- Save the “.env” file by going to the “File” menu and selecting “Save”.
-
Now, you have a copy of the settings file that you can customize for your own use
Importance of the .env File
The .env file is crucial for the operation of AutoGPT. It contains your OpenAI API key, which is needed for AutoGPT to interact with the OpenAI API and generate text. Without this key, AutoGPT won’t be able to function.
The .env file also contains other settings that control the behavior of AutoGPT. For example, it can contain settings that control the length and creativity of the text that AutoGPT generates, or settings that control how AutoGPT interacts with other services.
Steps to Configure the .env File
Configuring the .env file involves adding your OpenAI API key and any other settings you want to change. Here’s how to do it:
Open the .env file: In VS Code, navigate to the root directory of the AutoGPT project and open the .env file.
Add your OpenAI API key: Find the line that starts with OPENAI_API_KEY= and add your OpenAI API key after the equals sign. It should look something like this: OPENAI_API_KEY=your_api_key.
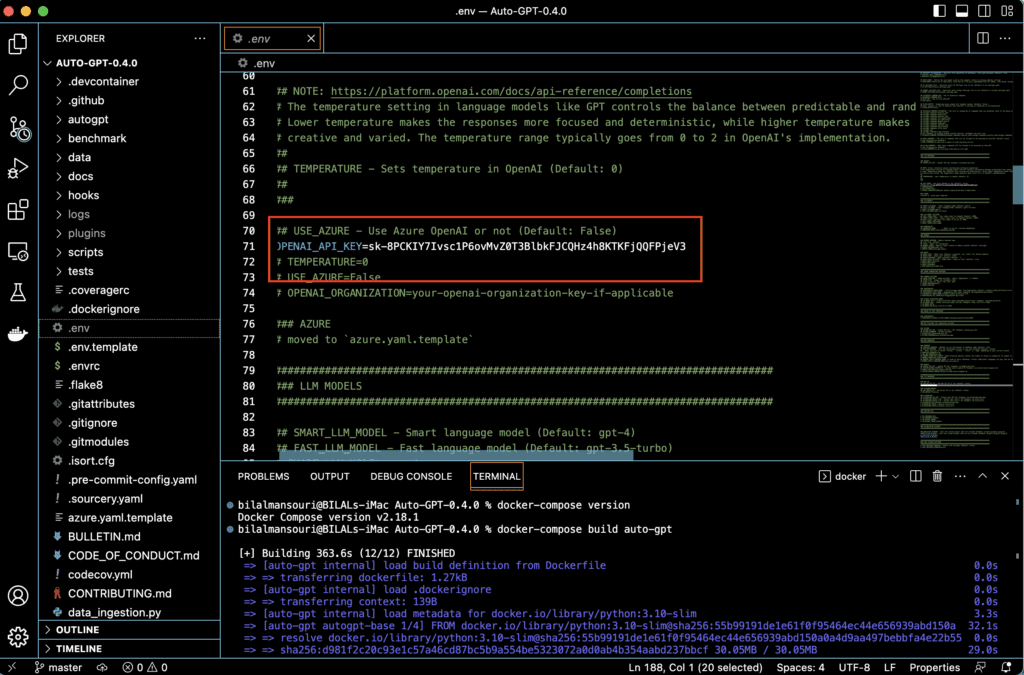
Save the .env file: Once you’ve made your changes, save the .env file. AutoGPT will read this file the next time it starts up, and the settings you’ve configured will take effect.
Remember, the .env file contains sensitive information, like your OpenAI API key, so it’s important to keep it secure. Don’t share it with others or post it online.
Adjustments for Mac Users
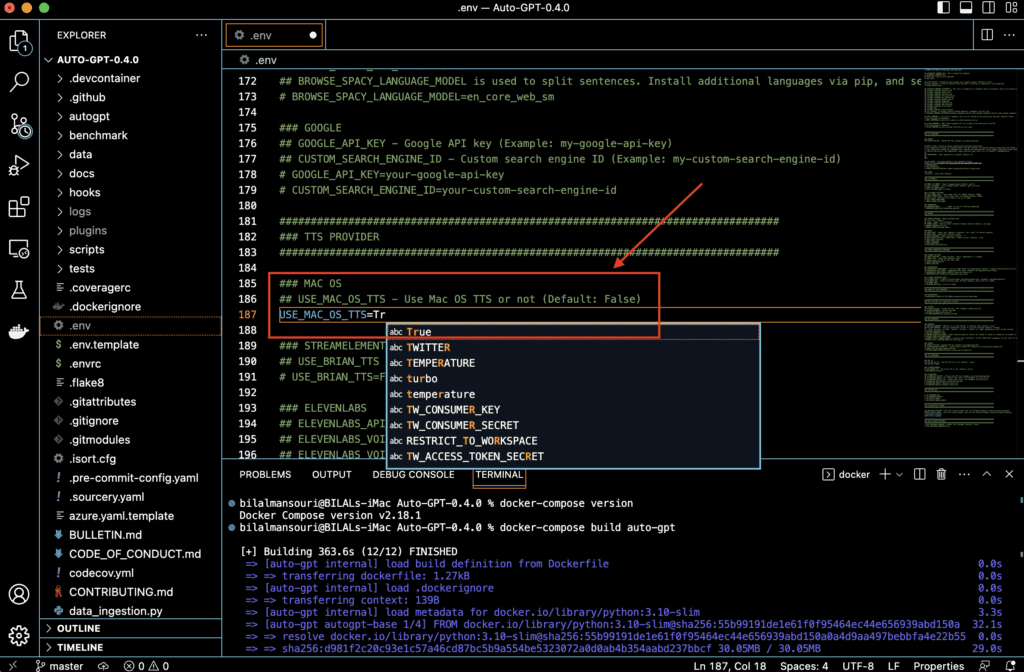
If you’re using a Mac, there’s an additional adjustment you need to make in the “.env” file.
The “.env” file contains a setting named “USE_MAC_OS_TTS”. By default, this setting is turned off (False). However, for Mac users, this setting needs to be turned on (True) for Auto GPT to work correctly.
Here’s how you do it:
-
-
- Open the “.env” file in Visual Studio Code.
- Locate the line that says
# USE_MAC_OS_TTS=False. - Change this line to
USE_MAC_OS_TTS=True. - Save the “.env” file by going to the “File” menu and selecting “Save”.
-
By making this change, you’re enabling Auto GPT to use the Mac OS Text-to-Speech (TTS) system.
Running Auto-GPT
Run with Docker
Easiest is to use docker-compose.
Important: Docker Compose version 1.29.0 or later is required to use version 3.9 of the Compose file format. You can check the version of Docker Compose installed on your system by running the following command:
docker-compose version
This will display the version of Docker Compose that is currently installed on your system.
If you need to upgrade Docker Compose to a newer version, you can follow the installation instructions in the Docker documentation: https://docs.docker.com/compose/install/
Once you have a recent version of docker-compose, run the commands below in your Auto-GPT folder.
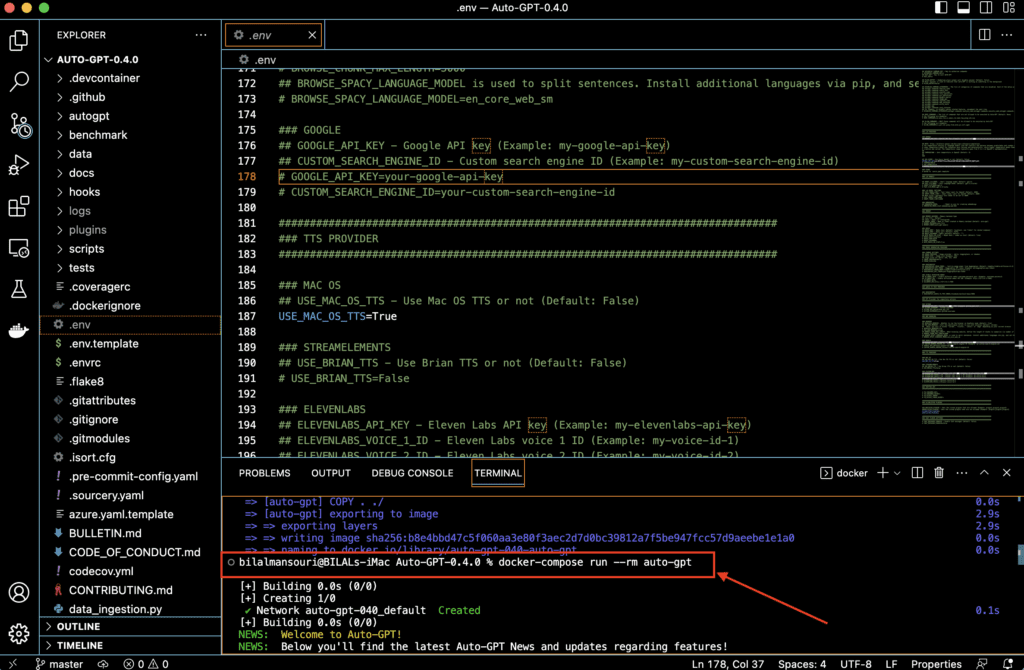
docker-compose build auto-gpt

Run Auto-GPT
docker-compose run –rm auto-gpt
Setting Up AI Assistant
Setting up your AI assistant with Auto-GPT has become even more streamlined and user-friendly. While the technical aspects of installation and configuration remain important, Auto-GPT now simplifies the process of defining your AI’s role and setting its goals. This is a crucial step as it guides the AI’s behavior and the types of responses it generates. Let’s guide you through this updated process.
Defining the Role and Goals of Your AI
With the new Auto-GPT, defining the role and setting the goals for your AI assistant is as simple as stating what you want Auto-GPT to do. For instance, you might say, “I want Auto-GPT to create an outline for an article about AutoGPT.” Auto-GPT will then automatically generate a name, role, and set of goals for your AI assistant based on your input.
Here’s an example of what Auto-GPT might generate based on the input above:
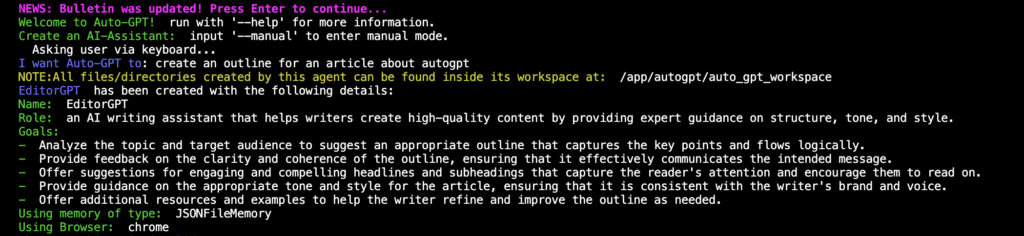
Name: EditorGPT
Role: An AI writing assistant that helps writers create high-quality content by providing expert guidance on structure, tone, and style.
Goals:
- Analyze the topic and target audience to suggest an appropriate outline that captures the key points and flows logically.
- Provide feedback on the clarity and coherence of the outline, ensuring that it effectively communicates the intended message.
- Offer suggestions for engaging and compelling headlines and subheadings that capture the reader’s attention and encourage them to read on.
- Provide guidance on the appropriate tone and style for the article, ensuring that it is consistent with the writer’s brand and voice.
- Offer additional resources and examples to help the writer refine and improve the outline as needed.
With your AI’s name, role, and goals defined, you’re now ready to start using Auto-GPT.
Different Modes of Operation
AutoGPT has several different modes of operation that control how it generates text. You can select a mode by adding a command line argument when you start AutoGPT. Here are the different modes:
Speak Mode: In speak mode, AutoGPT generates text in response to prompts that you type in. You can enter speak mode by starting AutoGPT with the command python main.py speak.
Continuous Mode: In continuous mode, AutoGPT generates text continuously, without waiting for prompts. This can be useful for generating large amounts of text. You can enter continuous mode by starting AutoGPT with the command python main.py continuous.
Self-Feedback Mode: In self-feedback mode, AutoGPT generates text and then uses its own output as the next prompt. This allows it to generate a continuous conversation with itself. You can enter self-feedback mode by starting AutoGPT with the command python main.py self-feedback.
Explanation of Logs and How to Access Them
Logs are records of events that happen while a program is running. AutoGPT generates logs that record things like the prompts it receives, the text it generates, and any errors that occur.
You can access the logs by opening the logs directory in the autogpt directory. Inside the logs directory, you’ll find a file named autogpt.log. This file contains the logs for your most recent session of running AutoGPT.
You can open the autogpt.log file in VS Code to view the logs. The logs are organized by date and time, so you can easily find the logs for a specific session.
Remember, logs can be very useful for troubleshooting if you encounter any issues while running AutoGPT. They can also be interesting to look at if you want to see more details about what AutoGPT is doing under the hood.
Related Article : SuperAGI vs AutoGPT: Comparative Study of Autonomous AI
AutoGPT Additional Features
AutoGPT comes with a variety of additional features that can enhance its functionality. One of these features is the ability to integrate with Google APIs, which can provide additional capabilities such as language translation and image generation. In this section, we’ll cover how to set up Google API keys for use with AutoGPT.
Google API Keys Configuration
Google provides a wide range of APIs (Application Programming Interfaces) that allow developers to interact with its services programmatically. These APIs require an API key, which is a unique identifier that is used to authenticate requests associated with your project.
Explanation of Google API Keys
A Google API key is a code that is passed in by computer applications that call an API (Application Programming Interface) to identify the calling program, its developer, or its user to the website. API keys are used to track and control how the API is being used, for example to prevent malicious use or abuse of the API. The API key often acts as a secret authentication token or a unique identifier.
Steps to Set Up Google API Key
Create a Google Cloud Project: To use Google APIs, you’ll first need to create a project on the Google Cloud Platform. You can do this by visiting the Google Cloud Console, signing in with your Google account, and creating a new project.
Enable the APIs You Want to Use: Once your project is created, you’ll need to enable the APIs you want to use. You can do this by navigating to the “APIs & Services” section of the Cloud Console, selecting “Library”, and then searching for the APIs you want to use (for example, “Translate API” or “Vision API”). Click on the API you want to use and then click “Enable”.
Create an API Key: After enabling the APIs, you’ll need to create an API key that AutoGPT can use to make requests to the APIs. You can do this by going to the “APIs & Services” section of the Cloud Console, selecting “Credentials”, and then clicking “Create Credentials” > “API key”. This will create a new API key that you can use with AutoGPT.
Add the API Key to Your .env File: Once you have your API key, you’ll need to add it to your .env file in the AutoGPT directory. You can do this by opening the .env file in VS Code and adding a new line with the format GOOGLE_API_KEY=your_api_key, replacing your_api_key with the API key you created.
Remember, just like with your OpenAI API key, your Google API key is sensitive information. Be sure to keep it secure and don’t share it with others or post it online.
With your Google API keys set up, you’re now ready to use the additional features provided by the Google APIs with AutoGPT!
Memory Backend Setup
AutoGPT can be configured to use a memory backend, which is a system that stores and retrieves data to improve the performance of the AI. Memory backends can help AutoGPT generate more consistent and coherent responses by remembering past interactions. In this section, we’ll cover what memory backends are and how to set them up.
Explanation of Memory Backends
A memory backend in the context of AutoGPT is a system that stores the history of the conversation. This history can then be used by AutoGPT to generate responses that are consistent with past interactions. For example, if you ask AutoGPT a question and then refer back to that question later on, AutoGPT can use the memory backend to recall the earlier part of the conversation and generate a relevant response.
There are several different memory backends that you can use with AutoGPT, including Redis, Pinecone, Milvus, and Weaviate. Each of these backends has its own strengths and weaknesses, and the best one to use depends on your specific needs.
Steps to Set Up Different Memory Backends
Setting up a memory backend involves installing the backend, configuring it to work with AutoGPT, and then updating your .env file to tell AutoGPT to use the backend. Here’s a general overview of the steps involved for each backend:
Redis: Redis is an open-source, in-memory data structure store that can be used as a database, cache, and message broker. To use Redis as a memory backend, you’ll need to install Redis on your system, start a Redis server, and then add a line to your .env file with the format REDIS_URL=redis://localhost:6379/0.
Pinecone: Pinecone is a vector database that’s designed for machine learning applications. To use Pinecone as a memory backend, you’ll need to create a Pinecone account, create a new Pinecone service, and then add a line to your .env file with the format PINECONE_API_KEY=your_api_key.
Milvus: Milvus is an open-source vector database that’s designed for AI and analytics. To use Milvus as a memory backend, you’ll need to install Milvus on your system, start a Milvus server, and then add a line to your .env file with the format MILVUS_HOST=localhost and MILVUS_PORT=19530.
Weaviate: Weaviate is a cloud-native, modular, real-time vector search engine. To use Weaviate as a memory backend, you’ll need to create a Weaviate account, create a new Weaviate service, and then add a line to your .env file with the format WEAVIATE_URL=your_weaviate_url.
Remember, just like with your OpenAI and Google API keys, any API keys or URLs you use for your memory backends are sensitive information. Be sure to keep them secure and don’t share them with others or post them online.
With your memory backend set up, AutoGPT will be able to remember past interactions and generate more consistent and coherent responses. In the next section, we’ll cover how to use AutoGPT to generate text.
Related Article : GPT Engineer : Comprehensive Guide to Easy Setup & Use
Text-to-Speech Configuration
AutoGPT comes with a text-to-speech feature, which allows it to convert the text it generates into spoken words. This can be useful for applications like virtual assistants or any scenario where you want to interact with AutoGPT using voice rather than text. In this section, we’ll cover how to set up the text-to-speech feature using Eleven Labs.
Explanation of Text-to-Speech Feature
Text-to-speech is a type of technology that converts written text into spoken words. It’s used in a variety of applications, from voice assistants like Siri and Alexa, to reading aids for people with visual impairments.
AutoGPT’s text-to-speech feature uses a service called Eleven Labs to convert the text it generates into speech. Eleven Labs provides high-quality, natural-sounding voices that can make interacting with AutoGPT feel more like having a conversation with a human.
Steps to Set Up Text-to-Speech with Eleven Labs
Setting up text-to-speech with Eleven Labs involves getting an API key from Eleven Labs and then configuring AutoGPT to use it. Here’s how to do it:
Create an Eleven Labs Account: To use Eleven Labs, you’ll first need to create an account. You can do this by visiting the Eleven Labs website and signing up.
Get an API Key: Once you’ve created an account, you’ll need to get an API key. This is a unique identifier that AutoGPT will use to authenticate with Eleven Labs. You can get an API key by logging into your Eleven Labs account and navigating to the API keys section.
Add the API Key to Your .env File: Once you have your API key, you’ll need to add it to your .env file in the AutoGPT directory. You can do this by opening the .env file in VS Code and adding a new line with the format ELEVEN_API_KEY=your_api_key, replacing your_api_key with the API key you got from Eleven Labs.
With your Eleven Labs API key set up, AutoGPT will be able to convert the text it generates into speech. This can make interacting with AutoGPT a more immersive and engaging experience. In the next section, we’ll cover how to use AutoGPT to generate text
Image Generation Configuration
In addition to generating text, AutoGPT also has the capability to generate images. This feature allows AutoGPT to create visual representations based on the text it generates or the prompts it receives. In this section, we’ll explain what the image generation feature is and how to set it up.
Explanation of Image Generation Feature
Image generation is a feature that allows AutoGPT to create images based on text prompts. For example, if you ask AutoGPT to generate an image of a “red apple on a green table”, it will attempt to create an image that matches that description.
This feature uses a service called DeepAI, which provides an API for a variety of AI models, including text-to-image generation. The images generated by this service are not perfect and can sometimes be abstract or surreal, but they can provide a visual aid that complements the text generated by AutoGPT.
Steps to Set Up Image Generation
Setting up image generation involves getting an API key from DeepAI and then configuring AutoGPT to use it. Here’s how to do it:
Create a DeepAI Account: To use DeepAI, you’ll first need to create an account. You can do this by visiting the DeepAI website and signing up.
Get an API Key: Once you’ve created an account, you’ll need to get an API key. This is a unique identifier that AutoGPT will use to authenticate with DeepAI. You can get an API key by logging into your DeepAI account and navigating to the API keys section.
Add the API Key to Your .env File: Once you have your API key, you’ll need to add it to your .env file in the AutoGPT directory. You can do this by opening the .env file in VS Code and adding a new line with the format DEEPAI_API_KEY=your_api_key, replacing your_api_key with the API key you got from DeepAI.
With your DeepAI API key set up, AutoGPT will be able to generate images based on the text it generates or the prompts it receives. This can add a visual dimension to your interactions with AutoGPT, making them more engaging and immersive.
Conclusion
Congratulations! You’ve successfully navigated through the comprehensive process of setting up AutoGPT. From understanding the prerequisites, obtaining the necessary API keys, to installing and configuring AutoGPT, you’ve taken significant strides in harnessing the power of this advanced AI tool.
But remember, the journey doesn’t end here. The real adventure begins now as you start to explore the capabilities of AutoGPT. Whether you’re using it to generate text, create images, or even convert text to speech, there’s a world of possibilities waiting for you.
So go ahead, start a conversation with your AI, ask it to generate some text or an image, or even have it read out a piece of text. Experiment with different prompts and settings, and see what AutoGPT can do. The more you use it, the more you’ll discover its capabilities and potential.
If you’ve enjoyed learning about AutoGPT and its capabilities, you might also be interested in exploring SuperAGI, another powerful AI tool. Check out our comprehensive guide on SuperAGI to learn more about its features and how to use it
Related Article : GodMode: web-based AutoGPT


Discussion about this post